I am absolutely thrilled to bits to announce that I will be joining the amazing Sophy Haes and the Uber talented Sharon Coles as a Design Team member for The Isobel Craft Collection and will be making and showing samples for the July Show on thecraftstore.com
I will have a dedicated TICC page here on the blog showing all makes with Sophy’s products and aim to put together some “how too’s” or Artorials detailing how projects were made for you to have a go yourself.
All stamps and stencils used can be found at thecraftstore or from Sophy’s Etsy Shop https://www.etsy.com/uk/shop/isobelcollection?ref=simple-shop-header-name&listing_id=869217624
Come and join us in the Crafting with The Isobel Craft Collection Facebook group and you will received a very generous discount code entitling you to 10% off any purchased of three items or more https://www.facebook.com/groups/craftingwiththeisobelcraftcollection/?ref=share
Plus there is always loads of ideas and inspiration with lots of hints and tips to get you motivated and always someone on hand to answer your questions.
Here’s a little taster of what you can expect, a mixed media project incorporating 15 sets of Sophy’s wonderful stamps..... hope you like it x x
30th May 2021
Thought I’d share a couple of journal pages using the Wonderland I and II stamps, using tone on tone makes for quite an atmospheric feel and changing the colour theme totally changes the feel even though it’s the same stamped characters and layout
What do you think?
Whatcha Doing Wednesday?I thought it might be a good idea to start doing a regular mid week blog spot where we can look in more detail at different projects and techniques, perhaps recreate any samples or go through new projects step by step so that you can either craft along with me or take away the ideas here and do your own version.
We could have a product focus, looking at all the ways certain items can be used or concentrate on individual stamp sets and what they can be used for! Add all your comments and suggestion as to what
you would like to see here in the box below or on the Crafting with the Isobel Collection Facebook group
To start us off this week i though we could start using the ever so popular Vintage Christmas stamp set
You can get yours
here and don't forgot the wonderful Sophy Haes as offered us a very generous 10% discount on three or more items while you are there, just go to checkout and use the code MEMBERS10OFF to take advantage
Today i am using some Tando grey board to create a set of ATC’s or Artist Trading Cards with a Christmassy theme, Tando greyboard is exceptional quality, you can literally throw anything at it and is brilliant value for money. You can get yours
here
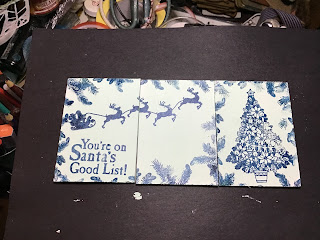
First i based coated all three of my cards in decortart Americana chalky paint in “refreshing” as i wanted a light minty background for stamping on to
I left these to dry then stamped my images from the Vintage Christmas stamp set using versafine claire in twilight, first the reindeers pulling the sleigh across the first two cards, making sure they butted up to each other so that there was no break between the stamped images.
I followed this with the “you're on Samta’s good list” sentiment on card number one and the Christmas tree itself on the third card, i then carefully used the fern branch freehand to frame the outer edges
I knew i wanted to creat a muted look for the final effect, the idea i had in my head was to create the impression that you were looking through the net curtains at the night sky just as Santa flew past. To do this i intended to use gel medium through a stencil, therefore it was important to think about my colouring medium before applying as anything water based was likely to run when gel medium was applied
I therefore opted to add a little colour using alcohol makers knowing these would dry permanent

Once the colour had been applied i used the snow flake stencil which is available
here And spread gel medium through it using a palette knife, my advice is, do one card at a time rather than trying to spread across all three together, lift off carefully and neaten edges with your finger or the edge of the palette knife. You can always tape your stencil down before you start if it makes you feel more comfortable
Dont worry if some of your snowflakes obscure your stamping, it will dry clear. Once dry i spritzed with a pearl glitter spray to give that net curtain feel. My final touch was to edge the outer of all my cards to bring them altogether, a further finishing touch would be to lightly touch the raised snowflakes with some gold or silver gilding wax
And there we are, a simple set if atc’s using the Vintage Christmas Stamp set, hope you enjoyed this little make, i would love to see your versions using this stamp set over on the
Crafting with the Isobel Craft Collection face book group x x
A bit of midweek mixed media using the Nautical stamp set
Well, its midweek again and this week it’s an exciting week as there is an amazing 25% off of selected stamps and stencils in the end of season sale over at The Isobel Craft Collection Etsy shop which you can visit
here.
Beware though the sales is time limited and there are only a few left of some designs as this is the last of the years most popular items, they have got to go to make way for some fantastic new goodies, so grab a bargain and have a play!!
I’m using one of the sale items today to create a quick and easy mixed media piece in just two colours. If you want to play along the set you meed is this one, it’s the nautical set and one of my favourites.
So, to start you are going to need a piece of A5 grey board i got mine from Tando Creative as its the best money can buy in my opinion as you can throw anything at it and it wont warp or separate, you will also need a blue and brown distress ink pad i used broken china and gathered twigs, some gel medium and acrylic paint in light shades of blue and brown, i used decoart americana in serene and primative
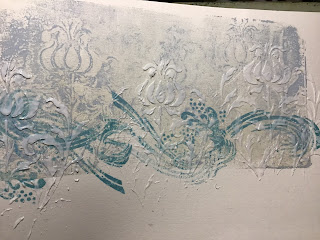
I also used a small gelli plate to create a mono print for my background and foreground pieces
I used a tiny pea sized amount of serene blue on the gel plate and brayered over until evenly distributed, i layered the stencil over top and used copy paper over to removed excess paint
I removed the stencil and placed it down again on a different part of the gel plate, used the same sheet of copy paper to remove excess again. Removed the stencil. I laid a sheet of mixed media paper over the top and pulled my first print. I repeated the whole process again using primitive paint and printed into the same print i had just pulled
I repeated this again using a second piece of mixed media card so that i had two pieces very similar, one for my background and one for my foreground. On one piece i stamped the wave stamp three times along the bottom, this was going to be my foreground piece. I them used gel medium through one of the sale stencils on three places on each piece then left this to dry fully. once dry i rubbed over some coloured guiding wax to bring out the texture and framed my piece by running the blue ink pad around the outside edge of my board
On a separate piece of mixed media card i stamped all the pieces that i wanted to use in my composition using the gathered twigs distress oxide i then spritzed the images in order to get the ink to run, this would add colour to my images, i heat set them with the heat gun and fussy cut the images out, i went round the edges with more gathered twigs with a blending tool so that there were no visible white cut edges
While i had the gathered twigs out i also ran some along the edges of my grey board and spritzed letting the ink run into the scene
I used red liner tape to secure the ends of some ivory organza ribbon onto the back of my greyboard, i used two pieces one above the other horizontally across the board twisting it in front a d leaving it fairy loose to emulate waves
I then glued a resin frame over the ribbon wearing my seahorse through. I had already spritzed the resin frame with some gold mica spray and highlight the edges with the blue gilding wax.
I wanted my seahorse to be my focal point but also wanted him to look as those he was bobbing through the waves so i used my foreground piece to create depth. I fussy cut round the gel medium foliage so that it gave the impression of coral and adhered to the from on a domed fashion. I them added all my cut out elements
To bring it all together i added a few splashes in blue, gold and white, stamped the bubble stamp randomly along the top edge and added some stone texture paste to the bottom edge, this adds a little but of weight and because the front section is domed it allows the piece to be freestanding.
And there we have a quick and easy pretty seaside scene, all at a bargain price. Don’t forget to add yours to your basket and show us your makes over at the crafting with the Isobel Collection facebook group
here and let me know what you would like to see on the blog next time x x


No comments:
Post a Comment